
How to move your first asset from 3ds Max into Blender. The whole path takes about ten minutes, nine of which are one-time setup.
NodeFlow Platform takes your asset out of 3ds Max and rebuilds it in Blender: geometry, textures, materials, lights and cameras. There are two ways to work — with the 3ds Max plugin, or without 3ds Max at all, by uploading an archive with the scene.
Video guide
If you would rather read, the same ground is covered step by step below.
Step 1. Sign up
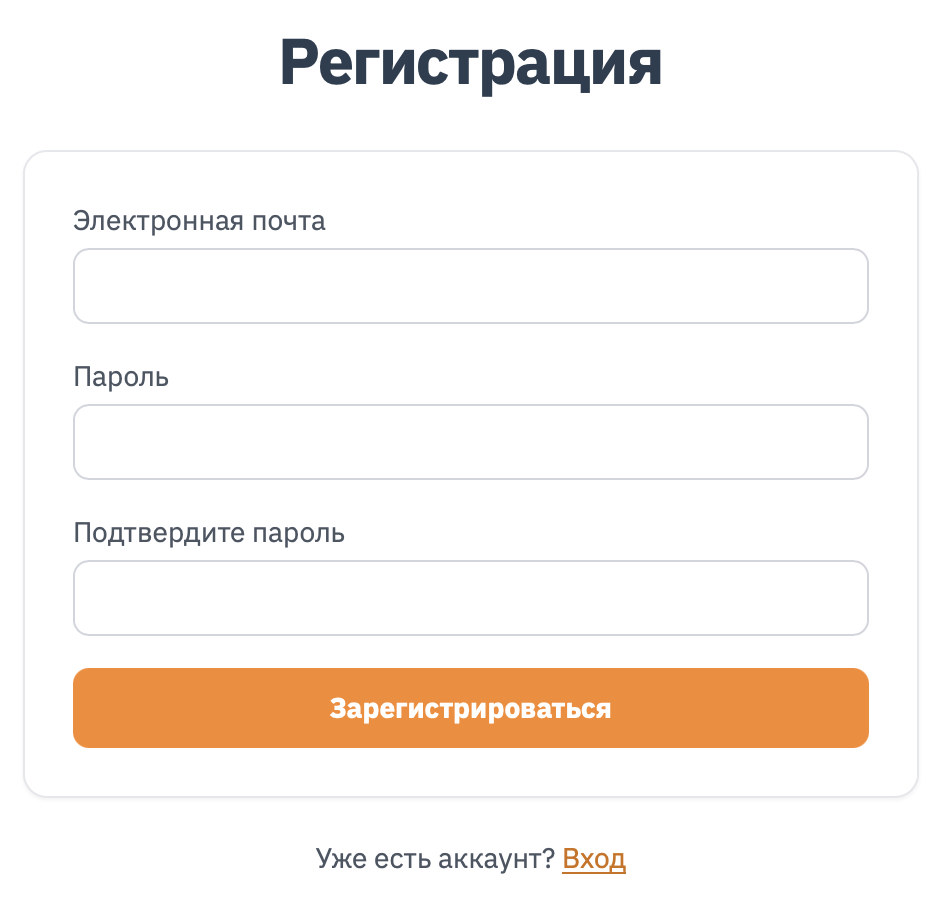
Registration is by e-mail only, with no social accounts attached.
- Open nodeflow.art and click Register.
- Enter your e-mail address, choose a password and repeat it in the confirmation field.
- Open the e-mail and confirm your address.
- Sign in with your e-mail and password — you will land in the Dashboard.
No e-mail after a couple of minutes — check your spam folder.
Step 2. Dashboard and API token
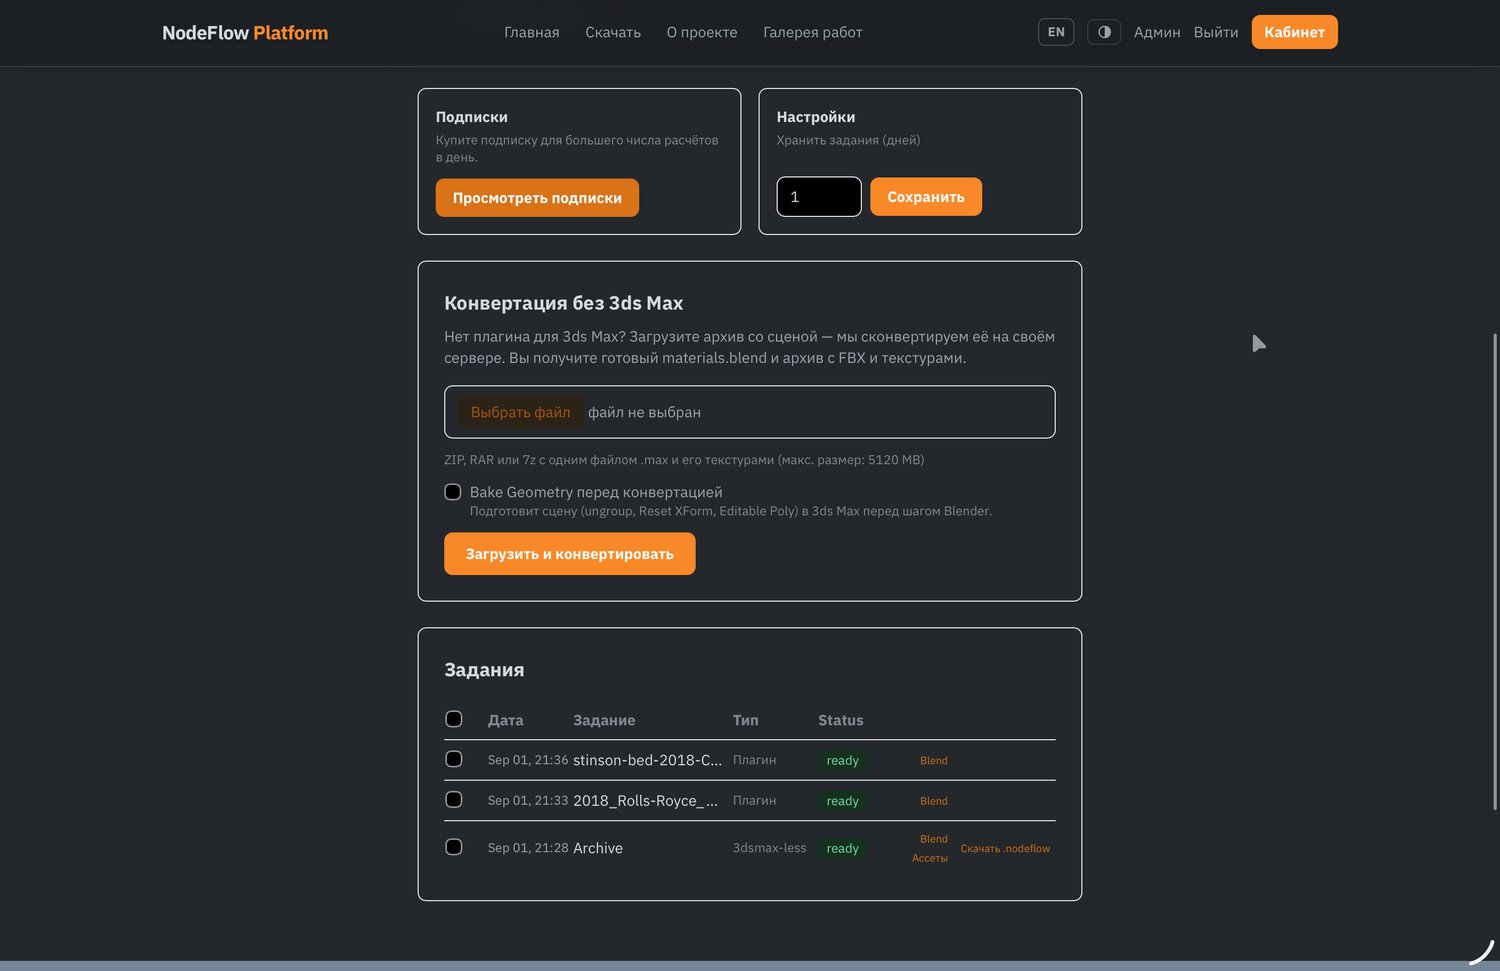
The Dashboard is the only page you will need in daily work. Everything lives here: the token, your subscription, archive uploads and the list of jobs.
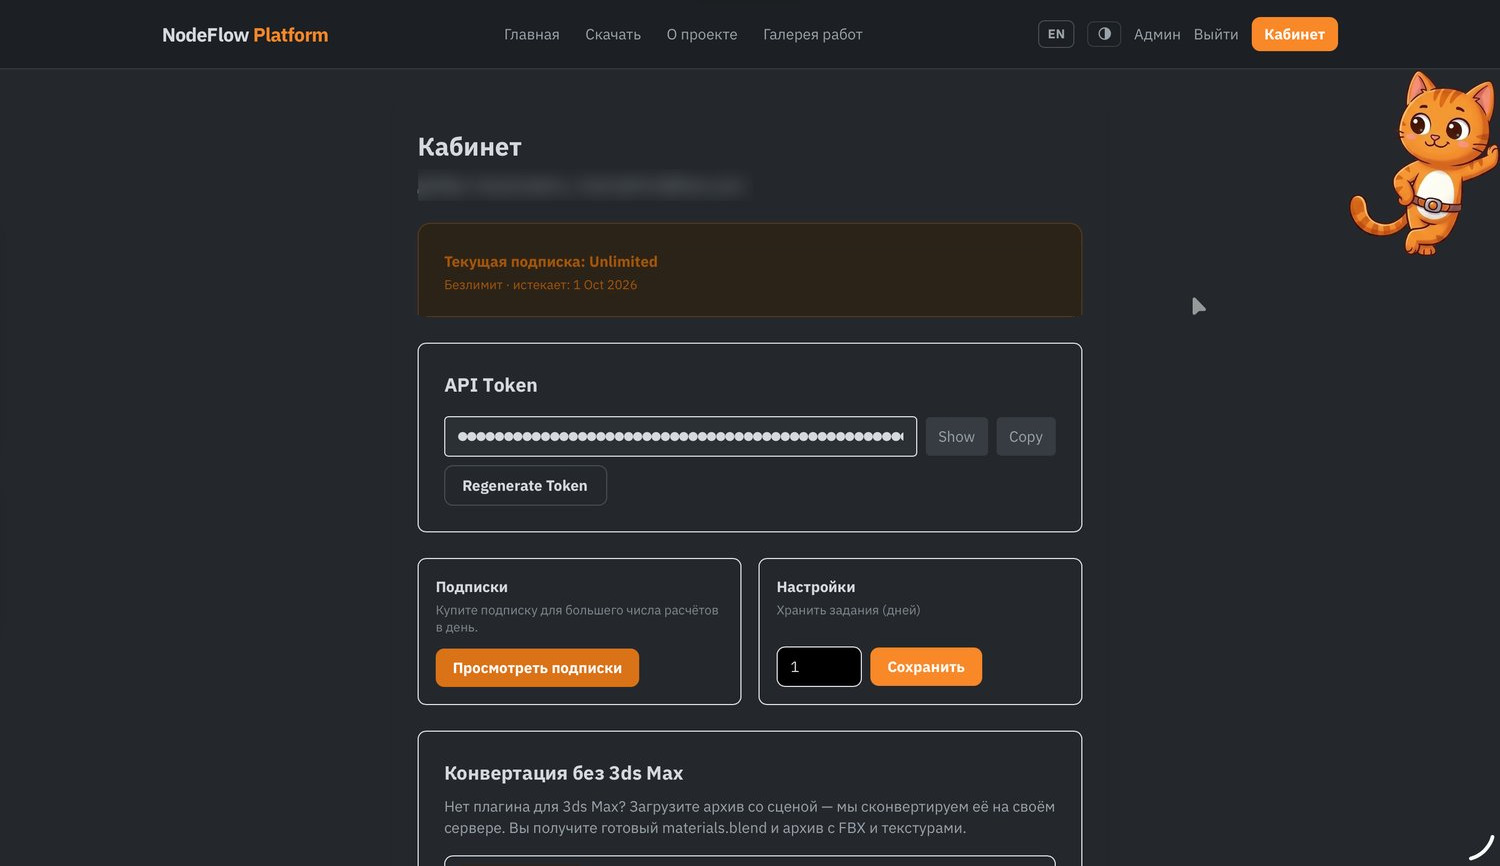
Subscription — which plan is active and until what date it runs.
API Token — the key that ties the plugin and the add-on to your account. Click Show to reveal the token and Copy to copy it. You will need it in the next two steps — keep the tab open.
The Regenerate Token button issues a new token in place of the old one. Use it if the token has leaked: once regenerated, the old one stops working and you have to enter the new one in both the plugin and the add-on.
Settings → Store jobs for (days) — how many days conversion results stay on the server before they are deleted. The default is 1 day. If you come back to your scenes later than that, set a larger number and click Save.
Jobs — the history of every conversion: date, name, type (Plugin or 3dsmax-less), status and download links. The status ready means the result is waiting for you.
The token is access to your account. Don't post it in chats, screenshots or videos. If you exposed it — click Regenerate Token.
Step 3. The 3ds Max plugin
3ds Max versions 2022 through 2027 are supported.
- Download the plugin from the Download section.
- Copy the
.dlufile into thePluginsfolder of your 3ds Max version. Usually that isC:\Program Files\Autodesk\3ds Max 20XX\Plugins\. - Restart 3ds Max.
- Open the Utilities tab in the command panel and launch NodeFlow Platform.
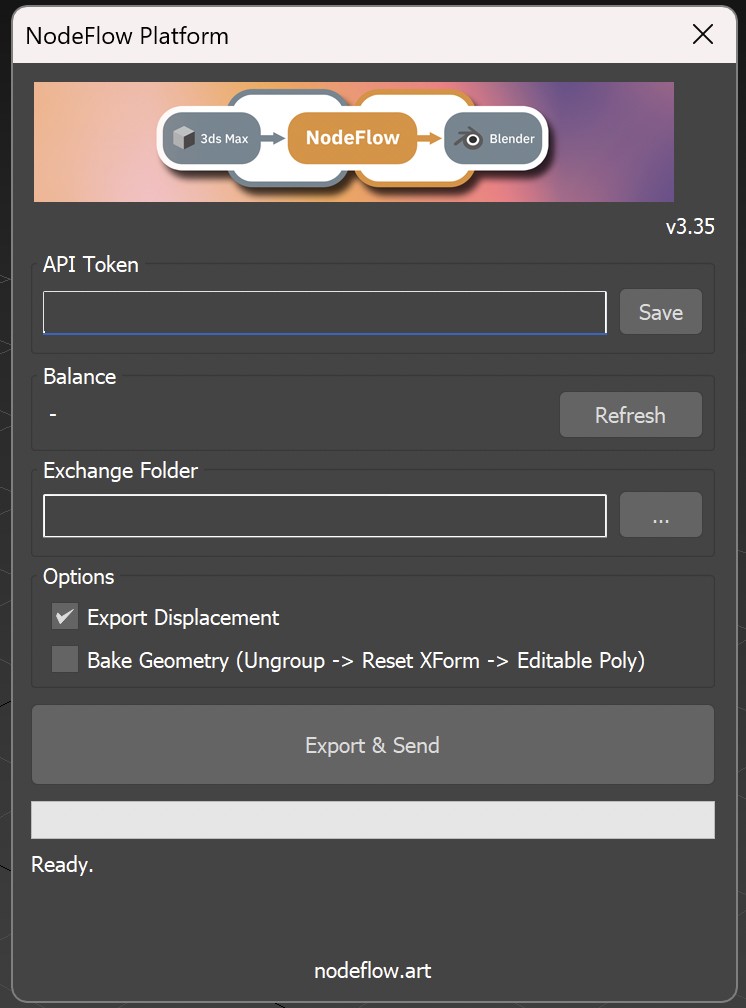
Set the window up once:
- API Token — paste the token from the Dashboard and click Save.
- Balance — click Refresh to confirm the server connection works and the balance came through.
- Exchange Folder — the shared folder the plugin and Blender use to pass files to each other. Pick any convenient folder on your drive.
Important: the very same folder has to be set in the Blender add-on in the next step. If they differ, Blender will never see the finished jobs.
Options:
- Export Displacement — carry displacement over. On by default.
- Bake Geometry (Ungroup → Reset XForm → Editable Poly) — collapses the geometry before sending: it breaks up groups, applies every 3ds Max modifier, then runs Reset XForm and converts objects to Editable Poly. Turn it on when the scene has many groups and objects with unapplied scale.
Step 4. The Blender add-on
Blender versions 4.2 through 5.2 are supported.
- Download the add-on from the Download section — it is a zip archive.
- In Blender open Edit → Preferences → Add-ons, click Install from Disk and pick the downloaded archive. You can also simply drag the archive into the Blender window.
- Tick the checkbox next to NodeFlow Platform.
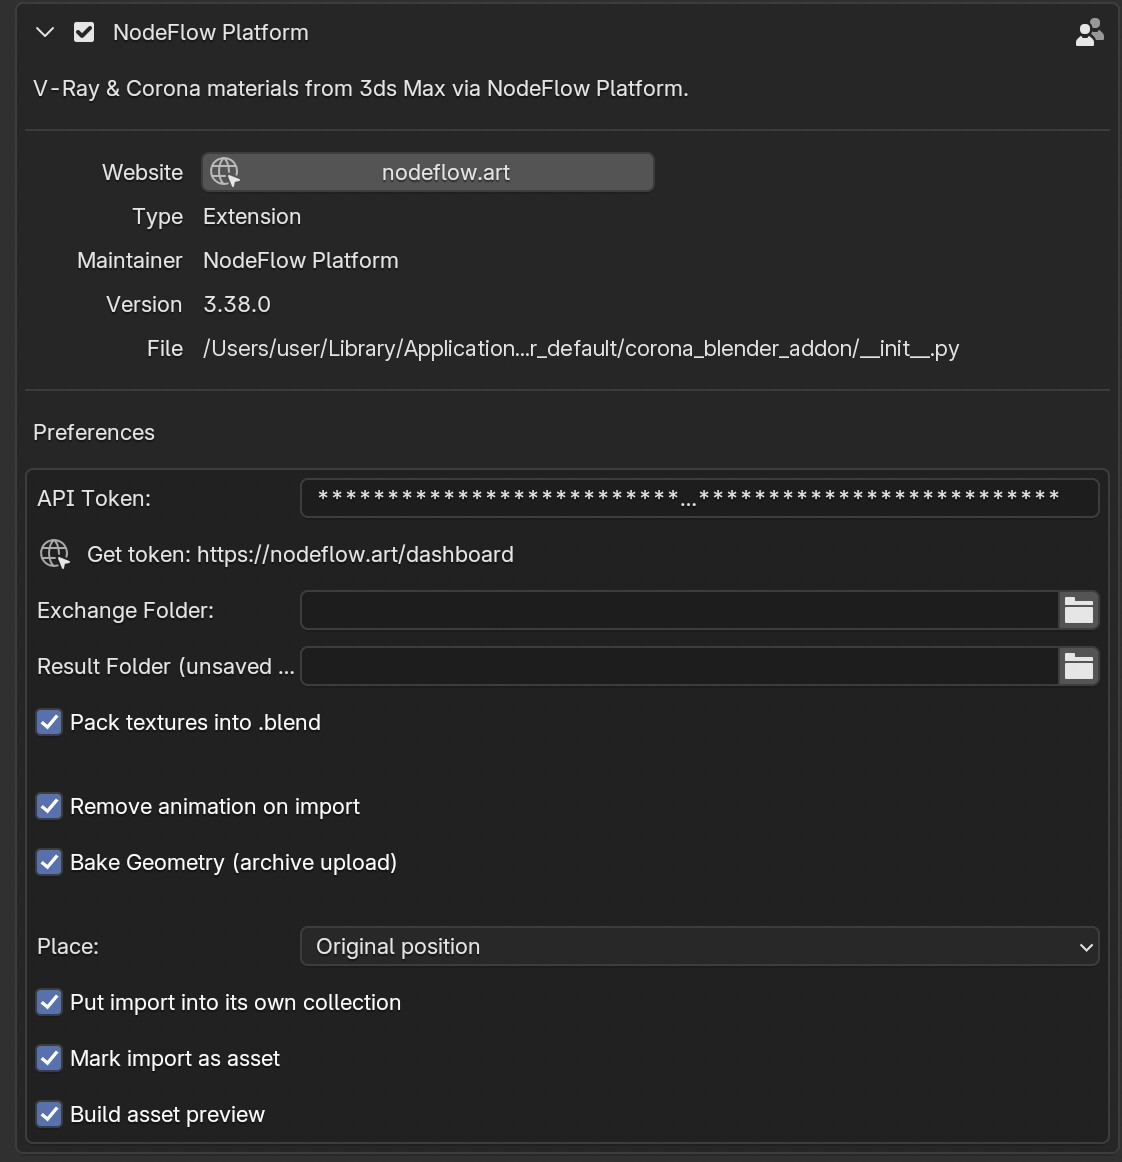
Expand the add-on settings and fill in:
- API Token — the same token from the Dashboard.
- Exchange Folder — the same folder that is set in the 3ds Max plugin.
- Result Folder — where the result arrives when the scene was sent as an archive from the add-on, without 3ds Max.
The remaining checkboxes are already at working values; you don't have to change them:
| Setting | What it does |
|---|---|
| Pack textures into .blend | packs the textures inside the project file — the scene travels as a single file |
| Remove animation on import | strips animation on import |
| Bake Geometry (archive upload) | the same geometry collapse, but for scenes sent as an archive |
| Place | where to put the imported asset: at its original position or at the 3D cursor |
| Put import into its own collection | puts the import into a separate collection |
| Mark import as asset / Build asset preview | marks the import as an asset and builds a preview for Blender's asset browser |
The NodeFlow Platform panel appears in the viewport side menu (the N key).
Step 5. Sending the scene
From here there are three routes: through the plugin if 3ds Max is installed, and two ways to do without it.
Route A. From 3ds Max
No scene preparation is needed: no collecting textures, no cleaning up materials.
- Open the scene in 3ds Max.
- Open the NodeFlow Platform window.
- Click Export & Send.
The status line at the bottom of the window shows the progress. A small asset is handled almost instantly, a large scene takes up to a minute.
Route B. As an archive, without 3ds Max
If 3ds Max isn't installed, the scene can be handed over as an archive. The result arrives in the add-on panel exactly as it does when working through the plugin.
From Blender
The add-on panel, the Upload Archive (no 3ds Max) block — the Choose Archive button. Pick the archive; everything else happens on its own.
From the Dashboard
The Conversion without 3ds Max block:
- Click Choose file and point at a ZIP, RAR or 7z archive holding one
.maxfile and its textures. The size limit is 5120 MB. - Turn on Bake geometry before conversion if you need it — the scene will go through ungroup, Reset XForm and Editable Poly before the Blender step.
- Click Upload and convert.
This route takes longer: a small asset is ready roughly 50 seconds after the upload, a large scene in about five minutes. The job is marked with the type 3dsmax-less in the list.
Route C. Through a .nodeflow file
For the case where one machine uploads the scene and another one assembles it in Blender.
- Upload the archive in the Dashboard, as in route B.
- Wait for the
readystatus in the Jobs table. - Click Download .nodeflow in the job's row.
- In Blender open the add-on panel, click Open .nodeflow and point at the downloaded file.
The asset is assembled in the scene exactly as with a normal import. The .nodeflow file travels to another computer without trouble — to the one that has Blender on it, for instance.
Step 6. Collecting the result in Blender
We don't send notifications when a job is done — check the status yourself.
- Open the NodeFlow Platform panel in Blender's side menu (the N key).
- Click Refresh.
- The Not imported section will show a job named after your scene and marked Done. The object count and the job type are shown next to it.
- Set the Import options if you need to: Place — where to put the asset, Folder and Tags — for the asset catalogue.
- Click Import.
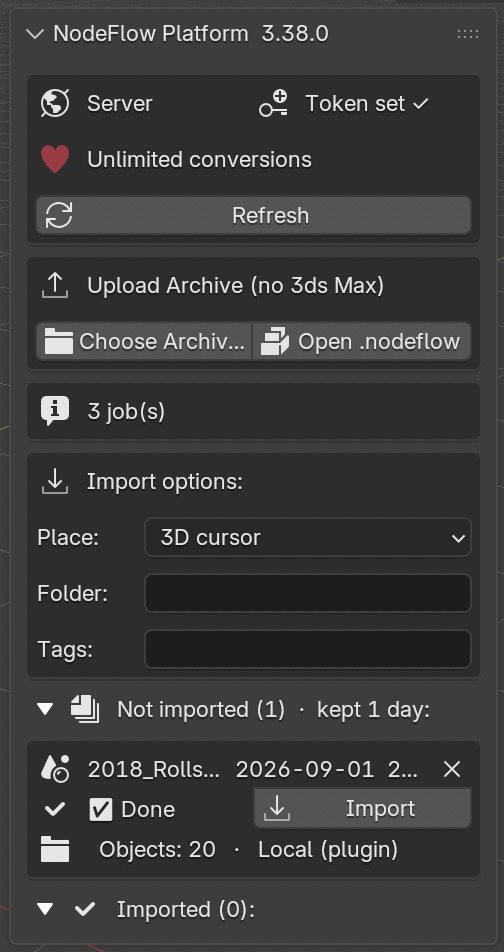
The asset appears in the scene: objects in their places, materials assembled on Cycles nodes, textures connected, lights and cameras where they belong.
Imported jobs move to the Imported section. The conversion status is always visible in the Dashboard too, in the Jobs table.
You can import several assets into one Blender file one after another. A later import will not steal materials and textures from an earlier one, even when the models share shader and file names.
What you get back
When working through the plugin, job folders with FBX geometry and textures appear in the exchange folder — the add-on picks them up from there itself.
When uploading an archive you receive a finished materials.blend and an archive with the FBX and textures. You can download them straight from the Dashboard — the Blend, Assets and Download .nodeflow links in the job's row.
Plans
One conversion is one asset: up to 150 objects, up to 150 materials, textures included.
| Plan | Price | Conversions per day |
|---|---|---|
| Free | — | 3 |
| Standard | 1350 ₽ / month | 15 |
| Profi | 2600 ₽ / month | 50 |
| Unlimited | 4500 ₽ / month | unlimited |
Three free conversions a day are enough to try the platform on your own scenes. Subscriptions are bought in the Dashboard: Subscriptions → View subscriptions.
If something went wrong
The plugin or the add-on won't connect to the server
The most common cause is network settings on your side: a VPN, a proxy, a corporate filter or an antivirus that inspects traffic. Turn the VPN off and try again. In the plugin you can test the connection with the Refresh button next to the balance: if the balance came through, the connection is fine.
Jobs don't show up in Blender
- The plugin and the add-on use the same API token.
- The Exchange Folder is the same folder in the plugin and in the add-on.
- You pressed Refresh in the add-on panel.
- The job's status in the Dashboard is
ready. - The job's storage period hasn't run out — the Store jobs for (days) setting in the Dashboard. The default is one day.
The token is rejected
Copy it again with the Copy button in the Dashboard — selecting it by mouse easily grabs a stray space. If you recently pressed Regenerate Token, the old token no longer works: enter the new one in both the plugin and the add-on.
The archive won't upload
It must hold exactly one .max file and its textures, in ZIP, RAR or 7z format, up to 5120 MB.
Something converted differently than expected
Open the conversion log in the Dashboard — it names the material and the slot whose transfer wasn't exact. Some properties are still reproduced approximately, and the log says so honestly. If the result looks plainly broken, write to us and include the job number.
Support
Questions, bug reports and scenes that converted badly: info@nodeflow.art
Do send the problematic scenes — most of the platform's improvements grew out of exactly those.